
In the world of self-hosted Git solutions, Gitea stands out as an excellent option for those looking for a lightweight, easy-to-use, and self-hosted Git repository management tool. If you’re setting up a home lab or want to manage your own source code repositories, Gitea is an excellent choice. It offers a streamlined, low-resource solution for Git hosting that’s perfect for hobbyists, developers, and small teams alike. In this article, we’ll explore why Gitea is a great addition to your home lab, how it compares to GitLab, and how you can easily set it up with Docker Compose.
What is Gitea?
Gitea is an open-source Git hosting platform designed to be lightweight, fast, and easy to install. It is a community-driven project, built with the goal of providing a self-hosted alternative to more popular, often heavier Git services like GitHub. Gitea was originally forked from Gogs (a similar project), but it has grown into its own unique platform with a focus on simplicity and performance.
Gitea allows users to host their own Git repositories, track issues, manage pull requests, and even offer some of the features typically associated with modern Git hosting services, such as continuous integration (CI), project management tools, and user access control.
Why Choose Gitea for Your Home Lab?
When managing your own Git repositories at home or in a private cloud environment, there are a few essential factors to consider:
- Performance: Gitea is known for its low resource usage compared to other Git platforms, which is crucial when you’re running it on a home server or under limited hardware.
- Simplicity: Gitea offers a simple and intuitive user interface (UI), making it easy for both beginners and experienced developers to set up and manage.
- Ease of Installation: Gitea is lightweight and comes with a straightforward installation process, particularly when using Docker, which makes it a great candidate for home labs.
- Scalability: While Gitea is designed for smaller teams and individual use, it still supports the basics of project management, issue tracking, pull requests, and more.
With these advantages, Gitea is the perfect solution if you’re looking for a self-hosted Git server for personal use or a small project.
How Gitea Compares to GitLab
While both Gitea and GitLab offer Git repository management solutions, they are designed with different goals and use cases in mind. Here’s a quick comparison to help you decide which is better for your needs:
| Feature | Gitea | GitLab Community Edition (CE) |
| Primary Focus | Lightweight Git hosting and project management | Full Git hosting with DevOps features (open-source version) |
| Resource Usage | Very low; optimized for small environments and low-resource setups | Higher than Gitea; more resources required for basic GitLab CE setup |
| Ease of Installation | Very easy, quick setup (especially with Docker) | More complex; may require more dependencies and configuration |
| Performance | Fast and lightweight, even on modest hardware | Heavier, may require more powerful hardware, especially for large repositories |
| UI / User Interface (UI) | Simple, clean, intuitive, and easy to use | More complex, but feature-rich with a more “enterprise” feel |
| Features | Basic Git hosting, issue tracking, pull requests, webhooks | Git hosting, issue tracking, CI/CD pipelines (limited in CE), project management tools |
| Continuous Integration (CI) | No native CI; integrates with external CI tools | Built-in CI/CD pipelines (basic features in CE, limited runners) |
| Project Management | Basic issue tracking, pull requests, and milestones | Advanced issue tracking, boards (Kanban-style), milestones, epics |
| Scalability | Best suited for small teams or personal projects | Scalable; can handle large teams, but performance may degrade without proper resources |
| Git Hosting | Yes, basic Git repository management | Yes, with advanced features such as repository mirroring, access controls |
| Authentication | Simple authentication, supports OAuth2, LDAP (via external integrations) | Integrated authentication (OAuth, LDAP, SSO) with more advanced security features in GitLab EE |
| Self-hosting Complexity | Very easy to self-host with minimal setup | More complex to self-host, requires more resources and configuration |
| Security | Basic security options (SSL, SSH) | More advanced security features such as two-factor authentication (2FA), audit logs (limited in CE) |
| Supported Database | SQLite (default), MySQL, PostgreSQL | PostgreSQL (default) |
| Documentation | Excellent, with simple guides and community-driven content | Comprehensive official documentation and guides, with detailed configuration options |
| Pricing | Completely free and open-source (self-hosted) | Free (Community Edition); paid plans for GitLab Premium, Ultimate (self-hosted and SaaS) |
Installing & Setting up Gitea with Docker Compose
One of the easiest ways to install Gitea in your home lab is by using Docker Compose. Docker Compose simplifies the management of multi-container Docker applications, and setting up Gitea is no exception. Here’s a step-by-step guide to help you set up Gitea on your server.
Prerequisites
Before starting, ensure you have the following:
- A server or machine running Docker and Docker Compose.
- Basic knowledge of Docker and Docker Compose.
- An accessible terminal or SSH access to your server.
Create a Docker Compose File
First, we need to create a docker-compose.yml file that will define how our Gitea container is set up. Here’s an example:
services:
  server:
    image: gitea/gitea:1.20.4
    container_name: gitea
    environment:
      - USER_UID=1000
      - USER_GID=1000
    restart: always
    networks:
      - mnetwork
    volumes:
      - .gitea_sql:/data
      - /etc/timezone:/etc/timezone:ro
      - /etc/localtime:/etc/localtime:ro
    ports:
      - "3000:3000"
- "222:22"If you want to run Nginx Proxy Manager and obtain an SSL certificate for your Gitea server, use the following version of the Docker Compose file.
services:
  server:
    image: gitea/gitea:1.22.3
    container_name: gitea
    environment:
      - USER_UID=1000
      - USER_GID=1000
    restart: always
    networks:
      - mnetwork
    volumes:
      - .gitea_sql:/data
      - /etc/timezone:/etc/timezone:ro
      - /etc/localtime:/etc/localtime:ro
    ports:
      - "127.0.0.1:3000:3000"
      - "222:22"

networks:
  mnetwork:
    external: true
name: mnetworkStart Gitea with Docker Compose
Once you’ve saved the docker-compose.yml file, navigate to the folder where the file is located and run the following command to start the Gitea container:
docker-compose up -dThis will pull the latest Gitea image, create the necessary containers, and start the application in detached mode.
Access Gitea
Once the container is running, you can access the Gitea web interface by navigating to http://:3000 in your browser. You should see the Gitea setup page where you can complete the installation process.
Follow the on-screen instructions to configure your database, repository paths, and user account.
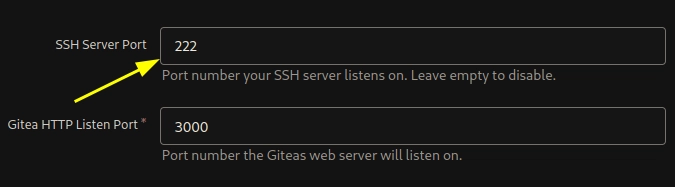
Setting up SSH port (optional)
After starting Gitea, the next step is to configure the SSH port to match the port you mapped in your Docker Compose file. To do this, open the Gitea web interface by navigating to http://:3000. Once there, locate the SSH server port settings and change the port number from 22 to 222. You can leave the rest of the settings at their default values. Once you’ve made the changes, click Install to finalize the configuration.
Conclusion
Gitea is a fantastic solution for those looking to manage their Git repositories with a minimal setup, especially for personal use or small teams. It’s lightweight, easy to install, and provides all the essential features you need to manage code in a home lab environment. Compared to GitLab, Gitea is faster to deploy, uses fewer resources, and still provides a powerful set of tools for code management. With Docker Compose, setting up Gitea is a breeze, making it a perfect addition to your home lab setup.