
We recently published an article on building a macropad using the Pi Pico, which you can find here : https://www.foxipex.com/2024/10/25/diy-macro-pad/
However, a significant drawback of the Pi Pico is its lack of Bluetooth/BLE support, preventing us from creating a wireless keyboard or macropad.
Creating a Bluetooth Keyboard Using ESP32
The ESP32 is a powerful and versatile microcontroller with built-in Bluetooth and Wi-Fi capabilities, making it an excellent choice for various DIY projects. One intriguing application is creating a Bluetooth keyboard. This guide will walk you through the steps to build your own Bluetooth keyboard using the ESP32.
What You’ll Need
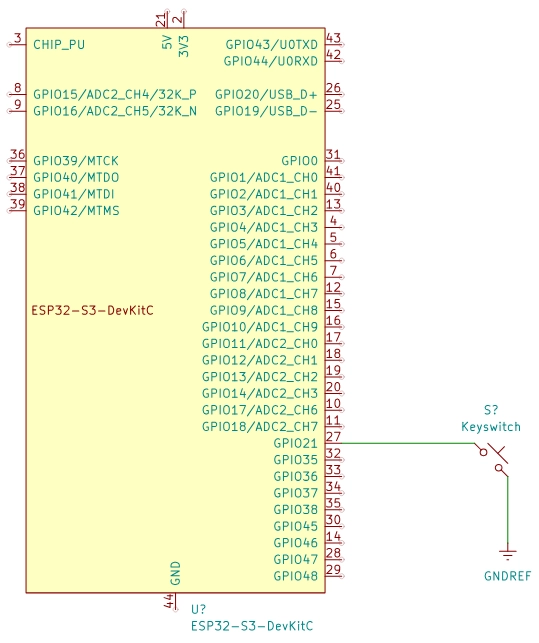
- ESP32 Development Board: Any variant will work, but the ESP32 DevKit is a popular choice.
- Keypad: You can use a matrix keypad (like a 4×4) or individual push buttons .
In this i will be using the single push button to test the basic functionality .
Coding
if you do not need features like layers , combos , tap dance etc then it is better to use Arduino ide to program your keyboard .
Requirement :
- Open your Libraries manager in Arduino ide and search for BleKeyboard and install the library
- if you cannot find the library then here is the direct link https://github.com/T-vK/ESP32-BLE-Keyboard/tree/master
#include <BleKeyboard.h>

BleKeyboard bleKeyboard;

const int buttonPin = 21;         // input pin for pushbutton
int buttonState

void setup() {
  Serial.begin(115200);
  Serial.println("Starting BLE work!");
  pinMode(buttonPin, INPUT_PULLUP);
  bleKeyboard.begin();
}

void loop() {

  if ((buttonState == LOW)){
    if(bleKeyboard.isConnected()) {
        Serial.println("Sending 'Hello world'...");
        bleKeyboard.print("Hello world");

        Serial.println("Sending Enter key...");
        bleKeyboard.write(KEY_RETURN);
    }
  }

}
Testing Your Bluetooth Keyboard
- Pairing:
- On your computer or mobile device, enable Bluetooth and search for devices. You should see your ESP32 listed.
- Pair the device;
- Functionality Test :
- Open a text editor or any text field and press the buttons on your keypad. You should see the “hello word” appear on the screen.
Keycodes
Here are names of keycodes that are supported by this library
Modifier Keys
- KEY_LEFT_CTRL
- KEY_LEFT_SHIFT
- KEY_LEFT_ALT
- KEY_LEFT_GUI (Windows key)
- KEY_RIGHT_CTRL
- KEY_RIGHT_SHIFT
- KEY_RIGHT_ALT
- KEY_RIGHT_GUI
Function Keys
- KEY_F1 to KEY_F12
Alphanumeric Keys
- KEY_A to KEY_Z
- KEY_0 to KEY_9
Special Characters
- KEY_SPACE
- KEY_ENTER
- KEY_TAB
- KEY_BACKSPACE
- KEY_DELETE
- KEY_ESC
- KEY_UP_ARROW
- KEY_DOWN_ARROW
- KEY_LEFT_ARROW
- KEY_RIGHT_ARROW
- KEY_HOME
- KEY_END
- KEY_PAGE_UP
- KEY_PAGE_DOWN
Other Keys
- KEY_CAPS_LOCK
- KEY_NUM_LOCK
- KEY_SCROLL_LOCK
- KEY_PRINTSCREEN
- KEY_PAUSE
Keypad Keys
- KEY_KP_0 to KEY_KP_9
- KEY_KP_PLUS
- KEY_KP_MINUS
- KEY_KP_MULTIPLY
- KEY_KP_DIVIDE
Conclusion
Building a Bluetooth keyboard using the ESP32 is a rewarding project that combines both hardware and software skills. With just a few components and some coding, you can create a custom keyboard for your specific needs, whether for accessibility, gaming, or just for fun. Experiment with different layouts, additional functions, or even customizing the keyboard to your aesthetic preferences. Happy building!